Activating a travel eSIM is one of the smartest pre-trip tasks you can do, and it’s much simpler than it sounds. Think of it as a digital SIM card that lets you download a local data plan for your destination, so you can completely avoid expensive roaming fees and get online the moment your plane lands.
Getting Your Travel eSIM Ready Before You Fly
The whole point of a travel eSIM is convenience. The process is designed so you can sort everything out from the comfort of your home, long before you even think about packing your bags. This way, you’re not left scrambling for spotty airport Wi-Fi or hunting down a physical SIM card shop when you’d rather be heading to your hotel.
It’s like pre-loading your phone with affordable, local data for your destination. You sidestep the shock of a massive bill from your home provider and get the freedom to order a taxi, pull up a map, or message family as soon as you touch down. Let’s walk through how to make it happen.
Why Travelers Are Switching to eSIMs
The move towards eSIMs for travel is picking up steam, mostly because people are fed up with paying a fortune for roaming. While many travelers are still learning about the technology, the benefits are making it a popular choice for staying connected abroad.
This is where a clear plan comes in handy. The entire process boils down to three simple stages:
Buying your plan: You choose a data package for your destination from a provider like TapSim. Once you pay, a QR code lands in your email inbox almost instantly.
Installing before you fly: This is crucial. While you’ve still got a reliable Wi-Fi connection at home, you scan that QR code to add the eSIM profile to your phone.
Activating when you land: The moment you arrive, you just go into your phone’s settings, switch on your new eSIM, and you’re connected to a local network.
The secret to a smooth experience is this “install now, activate later” approach. It separates the setup (which needs an internet connection) from the activation (which you do abroad), guaranteeing you’re ready to go the second you need to be.
As you get your eSIM sorted, you might find it useful to explore other ways to stay connected. This guide on How To Get Internet Access While Traveling Abroad offers a great overview of your options. Following these simple steps will completely change how you handle mobile data on your trips.
Your Pre-Flight Checklist for a Smooth Activation
Getting your eSIM working smoothly doesn’t start when you land; it begins before you even pack your bags. A few quick checks at home can be the difference between instant connectivity on arrival and a frustrating scramble for Wi-Fi.
Think of it as laying the groundwork. Taking five minutes to run through these points guarantees your phone is prepped and ready for its new travel eSIM, saving you a world of hassle later on.
Confirm Your Phone Supports eSIM
First things first: can your phone actually use an eSIM? Most smartphones made since 2018 have the technology built in, but it’s always smart to double-check rather than assume.
You can usually find out with a quick trip into your phone’s settings.
For iPhone users: Head to Settings > General > About. If you scroll down and see a number labeled “EID“, you’re all set. No EID means no eSIM support.
For Android users (Samsung, Pixel, etc.): Go to Settings > Connections > SIM Manager. An option like “Add eSIM” or “Add mobile plan” is the green light you’re looking for.
Make Sure Your Phone is Unlocked
This one is absolutely crucial. A travel eSIM will only work if your device is unlocked from your home network provider. An unlocked phone is simply one that’s free to accept a SIM (or eSIM) from any carrier.
If you bought your phone outright from a manufacturer like Apple or Samsung, it’s almost certainly unlocked. The potential catch comes if you got it on a contract from a network provider, as it might be locked to their service.
How can I tell if my phone is unlocked?
The simplest and most reliable way is to call your home provider directly. Just ask them, “Is my phone unlocked to be used with other networks?” They’ll give you a definitive answer and can often unlock it for you if you’ve met your contract terms.
Trying to install an eSIM on a locked phone is one of the most common pitfalls we see. It’s a simple check that prevents a major headache.
Secure a Stable Internet Connection
Your eSIM is a digital plan, and you need an internet connection to download and install it onto your phone. The last thing you want is to be wrestling with spotty airport Wi-Fi while your flight is boarding.
The best approach is to install your TapSim eSIM profile while you’re still connected to your reliable home or hotel Wi-Fi. The download is tiny and takes less than a minute, but a stable connection is key to making sure the profile installs without a glitch.
Ensuring your travel tech is sorted is a big part of modern trip prep. For more tips on getting organized, you might find our comprehensive travel planning checklist useful. With these three essential checks ticked off, you’re perfectly positioned for a quick and seamless activation.
How to Set Up an eSIM on an iPhone
If you’ve got an iPhone, you’re in luck—Apple has made the process of adding a travel eSIM incredibly smooth. Once you’ve picked your TapSim plan, an email with a QR code will land in your inbox. Think of this as your digital key to getting connected abroad.
We’ll walk you through the whole thing, from scanning that QR code to tweaking the final settings, so you can be confident you’re ready to get online the moment your plane touches down.
The QR Code Scan
Right, first things first. You’ve got the email from TapSim. To get the eSIM onto your phone, you’ll need a solid internet connection, so it’s best to do this while you’re still at home or have reliable Wi-Fi.
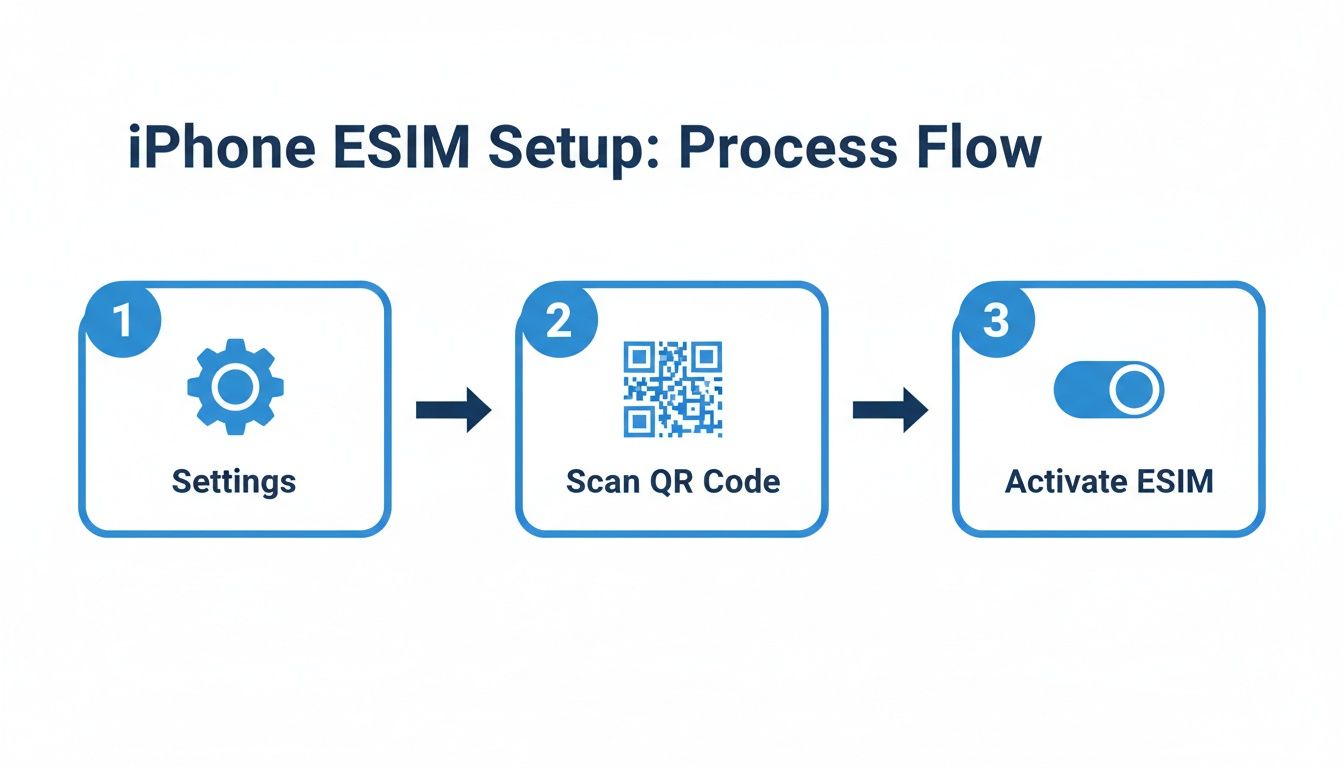
Here’s where to go in your iPhone’s settings:
First, open up the Settings app.
Tap on Cellular (this might be called Mobile Data, depending on your region).
From there, choose Add eSIM.
Your iPhone’s camera will pop up, ready to go. Just point it at the QR code from your email. I usually have the email open on my laptop or tablet, but printing it out works just as well. The phone should recognize it instantly and start downloading the eSIM profile. It’s a tiny download and is usually finished in less than a minute.
What if the Scan Fails? The Manual Method
Every now and then, a QR code just won’t play ball. It could be glare on the screen or a blurry camera. Don’t stress if this happens; there’s a simple workaround.
On the same “Add eSIM” screen, you’ll see an option to Enter Details Manually. Your TapSim confirmation email contains everything you need for this:
The SM-DP+ Address
An Activation Code
Simply copy and paste those two bits of information into the fields on your screen. It does the exact same thing as scanning the QR code, so it’s a foolproof backup plan.
Labeling and Setting Up Your New Line
Once the eSIM is on your phone, you’ll be prompted to give it a name. This seems like a small detail, but trust me, it’s a lifesaver if you travel a lot. Labeling it something clear like “Spain Data” or “Asia Trip” makes it much easier to manage alongside your main SIM.
Next, your iPhone will ask how you want the two lines to work together. For a travel setup, this is what you’ll want to do:
Default Line for Calls/Texts: Keep this set to your primary (home) number.
iMessage & FaceTime: Stick with your primary number for these too.
Cellular Data: This is the crucial one. Switch this over to your new travel eSIM.
Pro Tip: By selecting your TapSim plan for mobile data, all your apps, from Google Maps to Instagram, will use your prepaid travel data. This leaves your home number active just for receiving calls or texts, saving you from those dreaded roaming bills.
With that sorted, you should turn your new travel eSIM line off for now. You can do this in the Cellular settings. This is important because it stops the plan’s validity from kicking in before you’ve even left.
The final step is the one you do upon arrival. As soon as you land, dive back into Settings > Cellular, tap on your travel eSIM, and switch on Data Roaming. Your phone will then connect to a local network, and you’re online. If it doesn’t connect straight away, sometimes a quick check of your network settings is needed. We have a guide that covers how to check your APN settings on an iPhone which can solve most connection hiccups.
How to Set Up an eSIM on an Android Phone
If you’re an Android user with a Samsung, Google Pixel, or another modern device, you’ll find that getting a travel eSIM working is a piece of cake. While the exact menu names might differ a bit—Samsung has its “One UI,” Google has its “Pixel UI”—the fundamental steps for activating your eSIM are pretty much the same across the board.
Think of this as your roadmap to getting connected. Follow these steps, and you’ll have data ready to go the moment you land.
First, Find Your Phone’s eSIM Settings
Your first port of call is your phone’s connection or network settings. This is where you manage everything related to your SIMs, both the physical one and the digital eSIM. The path can vary slightly depending on who made your phone, but it’s always in a logical place.
Most Android users will find what they’re looking for by following a similar path.
On a Samsung Galaxy, you’ll want to open Settings > Connections > SIM manager.
For Google Pixel phones, the path is Settings > Network & internet > SIMs.
On other Android devices, keep an eye out for something like Settings > Network & Mobile > SIMs.
Once you’re in the right menu, look for an option like “Add eSIM” or “Add mobile plan.” Tapping this will fire up your phone’s camera, ready for the next step.
Because the path can differ slightly between manufacturers, here’s a quick reference table to help you find the eSIM settings on popular Android brands.
Typical eSIM Activation Paths on Android
Device Brand
Typical Path to Add eSIM
Samsung
Settings > Connections > SIM manager > Add eSIM
Google Pixel
Settings > Network & internet > SIMs > + Add SIM
OnePlus
Settings > Mobile Network > SIM Management > Add eSIM
Xiaomi
Settings > SIM cards & mobile networks > Manage eSIM
Oppo
Settings > Mobile Network > eSIM > Add eSIM
This table should get you to the right screen in no time, but remember that software updates can sometimes move things around.
Next, Scan the QR Code to Install the eSIM
With your camera ready, just point it at the QR code you received in your TapSim email. I find it’s easiest to have the email open on a laptop or tablet, but a good old-fashioned printout works just as well. Your phone should instantly recognize the code and start downloading the eSIM profile.
A quick but important tip: You’ll need a solid Wi-Fi connection for this download to work, so it’s always best to do this step at home or your hotel before you head out.
If for some reason the QR scan fails, don’t panic. There’s a manual option. On the same screen, you’ll see a choice like “Enter activation code” or “Enter details manually.” Your TapSim email contains everything you need—usually an SM-DP+ Address and an Activation Code—which you can just copy and paste in.
Finally, Configure Your Settings for Travel
Once the eSIM profile is installed, your phone will walk you through a few final choices. This is where you tell your device how you want to use your new travel data plan.
First, you’ll be prompted to give your new eSIM a name. Do it! Labeling it something clear like “Europe Data” or “Japan Trip” will save you a lot of confusion later when you’re trying to figure out which SIM is which.
Next, you need to assign roles to each SIM. This is the key to avoiding roaming charges from your home provider.
Set your new TapSim eSIM as the default for mobile data.
Keep your primary (home) SIM as the default for calls and texts.
This is the perfect setup for traveling. All your apps will use the affordable data from your TapSim plan, while your normal phone number stays active for any incoming calls or essential two-factor authentication texts.
The last crucial step is one you’ll do when you arrive at your destination. Head back into your SIM settings, select your TapSim eSIM, and flick the Data Roaming toggle to ON. This is what lets your eSIM connect to the local networks and get you online.
This simple flow—finding settings, scanning the code, and turning on roaming—is all it takes.
Getting this right is especially important in places where eSIMs are common. For example, Europe has seen a massive eSIM adoption rate, showing how popular this technology has become for travelers. With a TapSim eSIM, you can be confident you’re using a modern, reliable solution for staying connected.
With those few taps, your Android phone is all set for instant, affordable data wherever you’re headed next.
How to Fix Common Activation Glitches
Even with the best planning, technology can be unpredictable. The good news? Most eSIM activation problems are surprisingly simple to solve in just a few minutes, right from your phone. Think of this as your go-to checklist for those little headaches, so you can get online and get on with your trip.
It’s a familiar story: you’ve landed, you switch on your new travel eSIM, and… nothing. It’s a frustrating moment, but don’t worry. It’s almost always down to one of a handful of simple settings. We’ll walk through the most common snags travelers hit and the quick fixes to get you connected.
My QR Code Won’t Scan or Shows as Invalid
You’re pointing your camera at the QR code, but it just isn’t being recognized. Or maybe you get a pop-up saying the code is no longer valid. This usually isn’t a major technical fault, but a small setup issue.
First, cover the basics. A smudged camera lens or a dark room can easily stop a clean scan. Give your lens a quick wipe and move into a well-lit area. If that doesn’t do the trick, try zooming in a little on the QR code displayed on your other screen.
If you see an “invalid code” message, it often means the eSIM has already been installed. Your QR code is a one-time-use key. Once it’s used, it can’t be used again on any device. It’s worth double-checking your phone’s SIM manager to see if the plan is already there, just waiting to be turned on.
A Pro Tip: If the QR code is being stubborn, don’t waste any more time on it. Every TapSim email also includes details for manual installation. Simply copy and paste the SM-DP+ Address and Activation Code into your phone’s settings—it does exactly the same job.
I’ve Landed, But Have No Connection
This is, by far, the most common “problem” people run into. You’ve installed the eSIM back home, you land at your destination, you enable it, and… nothing. No signal bars, no 4G or 5G symbol.
Before you start to worry, run through this quick mental checklist:
Is Data Roaming on? This is the culprit nine times out of ten. Your travel eSIM must have Data Roaming enabled to hook onto local partner networks. You’ll find this toggle switch in your phone’s mobile data settings, specifically for your TapSim eSIM.
Have you given it a minute? Phones sometimes need a moment to search for and register on a new network, especially after being in airplane mode for hours. Give it a good two or three minutes to get its bearings.
Tried a full restart? The classic “turn it off and on again” is a classic for a reason. A full reboot forces your phone to re-scan for all available networks from scratch and often gives it the kick it needs to connect.
If you’ve done all that and still have no luck, your phone might be trying to connect to a network that isn’t one of our partners. You can usually fix this by manually selecting an approved network from the list included in your TapSim installation guide.
What About Other Error Messages?
Now and then, you might see a more specific error like ‘Unable to Activate eSIM’ or ‘PDP Authentication Failure’. These sound a lot more technical than they usually are. They often point to simple things, like a spotty internet connection when you first tried to download the eSIM, or a temporary local network blip.
If you see a stubborn error, our guide on what to do about a PDP Authentication Failure has more detailed steps to get you sorted.
As eSIMs become more popular, people are getting more comfortable with them. The market for this technology is growing fast, largely driven by travelers and remote workers who rely on easy, instant connectivity. With these simple troubleshooting tips in your back pocket, you’ll be ready to handle any minor activation snag like a pro.
Your Top eSIM Activation Questions, Answered
Heading off with a new travel eSIM can bring up a few last-minute questions, and that’s completely normal. Getting these sorted before you go is the key to a smooth arrival. Think of this as a final pre-flight check – we’ll walk through the common “when,” “how,” and “what if” scenarios so you can land with confidence.
When Should I Actually Activate My Travel eSIM?
This is easily the most common question we get, and getting the timing right makes all the difference. The best approach is a simple two-step process: install your eSIM profile at home before you leave, but only activate it once you’ve landed at your destination.
Why the split? Well, installing the eSIM requires a steady internet connection. You’ll be scanning a QR code from TapSim and downloading the plan onto your phone, so it’s much safer to do this over your reliable home Wi-Fi.
Activation is different. That’s just the act of flipping the switch in your phone’s settings to turn the eSIM on. This is what starts the countdown on your data plan’s validity. If you activate it before you land, you’re just wasting precious data days. By waiting until you arrive, you squeeze every bit of value out of the plan you paid for.
Imagine you’re flying to Italy for a trip to Europe. You could easily buy and install your TapSim eSIM a few days before your flight. Then, as soon as the plane’s wheels touch down in Rome, you just flick off airplane mode, toggle your eSIM on, and you’re online instantly. No time wasted.
Can I Still Receive Calls on My Normal Number?
Yes, you absolutely can! This is one of the standout perks of using an eSIM for travel data. Your phone is built for this, allowing your primary number and your travel data plan to work side-by-side.
Your regular SIM (whether it’s a physical card or another eSIM) can stay active for calls and texts from your home network, while your new TapSim eSIM takes care of all things data. Modern iPhones and Androids make this a breeze to manage.
When you set up the travel eSIM, your phone will ask you to assign roles. Here’s the simple formula for success:
Default for Calls & Texts: Keep this set to your primary home number. This is crucial for receiving important calls or those two-factor authentication texts from your bank.
Default for Mobile Data: Switch this over to your new TapSim eSIM. This tells your phone to use your affordable travel data for everything else – Google Maps, ride-sharing apps, social media, you name it.
This dual-SIM setup truly gives you the best of both worlds. You remain reachable on your usual number while completely dodging those outrageous data roaming fees from your home provider.
What if I Hit a Snag During Activation?
Even though the process is usually straightforward, it’s always smart to have a backup plan in case something doesn’t go as expected. If you’ve tried the usual troubleshooting steps and still can’t connect, don’t panic.
First, just double-check the two most common culprits. Is your phone definitely unlocked from your home network? And did you have a solid Wi-Fi connection when you first installed the eSIM profile? Getting those two things right solves the vast majority of issues.
If you’re still offline, it’s time to reach out. To get the fastest help from any support team, come prepared. Try to provide as many details as possible, and a quick screenshot of any error message you’re seeing is incredibly helpful. It gives the support agent a clear picture of what’s going wrong.
Here at TapSim, our support is built on honesty. We know travel can be stressful and that working data is a must-have. If there’s a technical issue on our end that’s stopping your eSIM from working, we promise to work with you to find a fast and fair solution. It’s all about giving you the peace of mind to actually enjoy your trip.
Ready to travel without worrying about roaming fees? TapSim offers fair, fast, and honest travel eSIMs for over 150 destinations. Check available eSIMs on TapSim.net and get connected the moment you land.
You’ve just landed in a new country, phone in hand, but the internet isn’t working. It’s a modern traveler’s nightmare, but don’t worry—the fix is usually surprisingly simple. Before you…
Dual SIM technology is a bit like having a hybrid car. It intelligently switches between two power sources to give you the best performance and efficiency. For your phone, this…
Figuring out how much data you’ll need for a trip can feel like a shot in the dark, but it really doesn’t have to be. For a standard week-long holiday,…
For any traveler, the best pay-as-you-go (PAYG) option is almost always a modern eSIM. Think about it from a practical standpoint: you get instant activation right from your phone, transparent…
Getting a new iPhone is always exciting, but for a traveler, ensuring your eSIM transfers smoothly is crucial. Whether it’s your primary number or a travel data plan for an…
Not long ago, staying connected abroad meant navigating a minefield of eye-watering roaming charges or scrambling to find a local SIM card the moment you landed. Thankfully, things have moved…
You’ve just landed, your travel eSIM is activated, but… no internet. It’s a classic travel headache, and the culprit is often a tiny, overlooked detail: your APN settings on iPhone.…